2014 Camaro SS LML Build Thread

Jakezed22

Active member
Dec 2, 2016
158
53
28
Hey guys i've been apart of the forum for a while and active on face book with my camaro build. And i want to post my build on here in hopes of having better conversations and more positive/helpful feedback. Seems like everyone on facebook wants to tell you what to do exactly their way and if you disagree well you just havent realized how amazing and important they are. Although i have learned alot from some guys on there im kinda sick of the attidtude some people give.

Ill get the basics out of the way, i completed my swap with a lb7 and 4l80e the first time around. Had most everything working but of course wanted more. I wanted it 100 percent the car that gm would've built if they did. That includes every single thing working as it should.

So this round ill be using a LML and a 6L90e Trans. I had subframe spacers before im working on getting rid of them so the car sits and rid just like any other 5th gen camaro.

Ive got a friend on here from face book, Dustin and his unreal nice 67 duramax camaro. We started a facebook group called - duramax swap cars- if you wanna check it out.

Ive also got a youtube ive been documenting my projects on - https://www.youtube.com/user/benishee/featured

Okay with all that out of the way lets get some pics posted!

20200923_183812.jpgIMG_20200905_074241.jpgIMG_20200907_123829_980.jpgIMG_20200908_130741_361.jpg


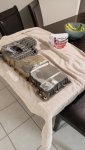
Thats her with the lb7/4l80e combo. this next pic is mocking up the accessories and i modified the thermostat housing to be run backwards. These are just what i have on the computer at the moment. ill grab my phone and start updating current events on the car as it progresses from now on.
20201109_220905.jpg20201115_141257.jpg20201112_174608.jpg
 

TheBac

Why do I keep doing this?
Staff member
Apr 19, 2008
15,302
1,596
113
Mid Michigan
Nice! How the heck did you fit it in there?!? :LOL: We'll help as much as we can. Thanks for bringing your build here. :)
 

Jakezed22

Active member
Dec 2, 2016
158
53
28
Thanks for the positivity! It fits pretty tight but it does. Duramax always seems alot bigger then it is lol.

Was a productive weekend I got my subframe done. Lowered the rack and pinion an inch for oil pan clearance. And moved a cross member back that used to be under neath it. I hope to keep everything looking factory as possible. I want you to have to look close to tell its been modified. 20210110_185619.jpg20210110_185612.jpg20210110_181911.jpg20210110_181909.jpg20210110_181859.jpg20210110_181852.jpg20210110_181856.jpg20201229_215111.jpg20201229_215108.jpg20201229_161716.jpgThis last image is what my first solution was at getting it to fit. The 3 inch rectangle tube spaced the subframe down allowing me to run factory oil pan. Now will be running the subframe in the original location so the suspension will be proper and the car is on bags and I like it low.
 

JoshH

Daggum farm truck
Staff member
Vendor/Sponsor
Feb 14, 2007
13,588
611
113
Texas!!!
Cool project. Are you worried at all about bump steer that lowering the rack might cause?
 
  • Like
Reactions: Jakezed22

Jakezed22

Active member
Dec 2, 2016
158
53
28
I had the entire subframe dropped 3 inches before. And then used the air bags to raise it back up to proper height. It handled really well like that. Even though the rod links were at a bit of an angle. So this should be if anything better then previous. Well at least I hope so lol. Worst case scenario maybe I can fab up offset tie rods if needed?
 

Chevy1925

don't know sh!t about IFS
Staff member
Oct 21, 2009
21,106
4,841
113
Phoenix Az
I had the entire subframe dropped 3 inches before. And then used the air bags to raise it back up to proper height. It handled really well like that. Even though the rod links were at a bit of an angle. So this should be if anything better then previous. Well at least I hope so lol. Worst case scenario maybe I can fab up offset tie rods if needed?

space the tie rods down 1" at the knuckles and you will be good assuming the rack was strictly moved 1" down and no other direction. offset only will only work if the tie rod pivoit point moves down that 1", not offsetting where the rod its self attached to the tie rod.

what you did before would work with no issue as you moved all the suspension pivot points down together (other than the top strut mount but thats not a big deal). what you did now is completely change the geometry of the steering. 1" can make a VAST difference in bump steer, specially on a strut style front end. moving the tie rod ends down 1" will help but wont put you back to 100% factory. it should get you in a good ball park though.
 
  • Like
Reactions: Jakezed22

Jakezed22

Active member
Dec 2, 2016
158
53
28
space the tie rods down 1" at the knuckles and you will be good assuming the rack was strictly moved 1" down and no other direction. offset only will only work if the tie rod pivoit point moves down that 1", not offsetting where the rod its self attached to the tie rod.

what you did before would work with no issue as you moved all the suspension pivot points down together (other than the top strut mount but thats not a big deal). what you did now is completely change the geometry of the steering. 1" can make a VAST difference in bump steer, specially on a strut style front end. moving the tie rod ends down 1" will help but wont put you back to 100% factory. it should get you in a good ball park though.

Excellent points, I never even thought about spacing the tie rods down at the knuckles. I know its close to the rim but ill definetly look into this. Thank you.
 

Chevy1925

don't know sh!t about IFS
Staff member
Oct 21, 2009
21,106
4,841
113
Phoenix Az
if that wont work, you can do an off set at the rack end where the inner tie rod attaches to move them back up 1". Just need to make sure the leverage wont overwork the threads of the adapter (make sure its tight in there) and it wont rock. it will induce more wear into the rack though.
 

Jakezed22

Active member
Dec 2, 2016
158
53
28
Ah yes, Thats what I ment by offset tie rods before. I know I saw it some where, someone had made adapters to offset at the inner tie rod. Was a v8 swapped jetta if I remember. I like your idea of dropping the mount at the knuckle. I'll be in the garage tonight and check it out. What would you do in that case? Convert to a spherical rod end and drill the knuckle for a normal bolt?
 

Chevy1925

don't know sh!t about IFS
Staff member
Oct 21, 2009
21,106
4,841
113
Phoenix Az
Ah yes, Thats what I ment by offset tie rods before. I know I saw it some where, someone had made adapters to offset at the inner tie rod. Was a v8 swapped jetta if I remember. I like your idea of dropping the mount at the knuckle. I'll be in the garage tonight and check it out. What would you do in that case? Convert to a spherical rod end and drill the knuckle for a normal bolt?

Yes but don’t just drill the knuckle out, tap it and then use a long enough bolt to use a nut on the other side. Not only will that stop any slop from causing wear, it creates a secondary safety with a second nut to lock it in.
 
  • Like
Reactions: Jakezed22

Jakezed22

Active member
Dec 2, 2016
158
53
28
Small update, oil pan cut down. The LML has a bigger pick up tube, well it looks bigger its round not rectangle, so I was able to cut about 1.4 inches off of it instead of 1.85 inches I could've cut off an older model. Anyways should be able to get pan on tonight then I can get the heads off the motor for studs and gaskets 20210113_081450.jpg20210113_081443.jpg20210113_081443.jpg
 

Attachments

  • 20210113_081438.jpg
    20210113_081438.jpg
    259.4 KB · Views: 18