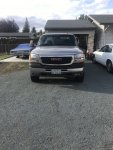
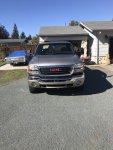
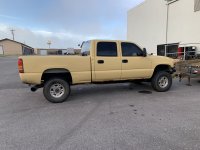
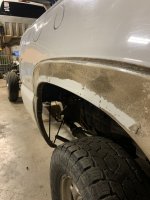
Finally did something I’ve wanted to do since buying the truck in 2008. Changing the front end to match the 2003-2007 Sierra HD look. Still got some adjustments to do left to right to get my gaps correct.
"OFFICIAL" What did you do to your D-Max today?
- Thread starter Hot COCOAL
- Start date
You are using an out of date browser. It may not display this or other websites correctly.
You should upgrade or use an alternative browser.
You should upgrade or use an alternative browser.
Nice. ")
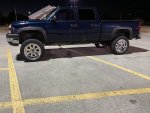
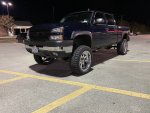
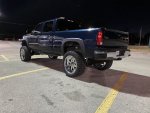
I did something very different to my truck. I installed a 6” lift and 35” tires with the help of a good friend. I also changed the front bumper back to chrome and installed a 2015-2019 chrome rear bumper to better tie in the new polished wheels. I need to adjust the rear bumper some; it’s rolled up a little to clear the receiver hitch. I’m getting some spacers to drop the hitch so I can rotate it down. It’s a 6” BDS no torsion bar drop lift, and the wheels are 22x11 with zero offset fuel forged, and the tires are 325/50 dick cepek trail country exp. I’m very happy with it all so far. Pictures are pre-alignment.
Attachments
Did you drill new holes for the rear bumper? I thought that's all guys where doing and the didn't have to drop the hitch. I've had one sitting in my garage for about a year now. I got a heavy bumper pull travel trailer and am reluctant to switch to a bumper that doesn't support the hitch. Trying to side if I'm going to beef it up or go to a 5th wheel.I did something very different to my truck. I installed a 6” lift and 35” tires with the help of a good friend. I also changed the front bumper back to chrome and installed a 2015-2019 chrome rear bumper to better tie in the new polished wheels. I need to adjust the rear bumper some; it’s rolled up a little to clear the receiver hitch. I’m getting some spacers to drop the hitch so I can rotate it down. It’s a 6” BDS no torsion bar drop lift, and the wheels are 22x11 with zero offset fuel forged, and the tires are 325/50 dick cepek trail country exp. I’m very happy with it all so far. Pictures are pre-alignment.
I have a Curt XD 16k lb receiver hitch on my truck that I installed when I removed the roll pan and installed this bumper. I did that because my stock hitch was bent and discarded when I removed it for my roll pan 10+ years ago, and I didn't want to buy another crappy stock hitch to replace it. The hitch I installed sits higher, closer to the bumper than the stock hitch, and I ended up spacing it down with some 1/2" thick plate so the bumper would roll down level. To install the bumper, we trimmed the upper bolt hole tabs off the brackets that came on the bumper, slid it in place and positioned it where it looked right, clamped it in place, drilled 2 1/2" holes per side, and bolted it on.Did you drill new holes for the rear bumper? I thought that's all guys where doing and the didn't have to drop the hitch. I've had one sitting in my garage for about a year now. I got a heavy bumper pull travel trailer and am reluctant to switch to a bumper that doesn't support the hitch. Trying to side if I'm going to beef it up or go to a 5th wheel.


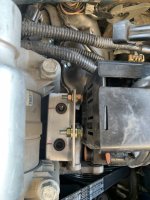
Pulled the stock fuel sending unit and modified it to work with my fuel cell. Also modified the stock float arm to match the arm that came with the fuel cell. All i have left to do is hook the wires up and mount to the bracket that fits down in the fuel cell. Brendon @Bbuchanan11 has the same set up and has helped me a lot to get this done right.
Also took the Beans sump off and cleaned it up. If anyone is looking for one let me know


Sent from my LM-G900 using Tapatalk
Also took the Beans sump off and cleaned it up. If anyone is looking for one let me know


Sent from my LM-G900 using Tapatalk
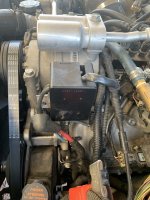
Today I started moving my glow plug controller. Sean repositioned it I’m guessing when he redid the fuel lines or when he put the driver side dip stick in. It was hanging from a stud on the firewall and I just got tired of looking at it ?. This may or may not be the final position as I could put it back at the back of the motor but more solidly mounted. Anyways this is what I got so far. I won’t have to modify any wiring short of rerouting some wires.
Attachments
Got all the parking light pigtails hooked back up. When the truck was stolen they cut most of the wires instead of unplugging them. Decided to use something I seen on the internet for making the connections.
Used a Makita heat gun and it turned out great. Did a pull test on the wires and they arent going anywhere

Sent from my LM-G900 using Tapatalk
Used a Makita heat gun and it turned out great. Did a pull test on the wires and they arent going anywhere

Sent from my LM-G900 using Tapatalk
^^^^ Those things are pretty slick. ^^^^
I used them to hook up a radio in the vette. Makes for a clean install.
I used them to hook up a radio in the vette. Makes for a clean install.
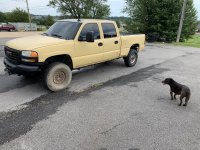
I’ve been “trying to sell it” for about 6 months with basically no interest. I’ve started it a few times but it hasn’t moved in 8 months. Sunday I had a little extra time and finally unloaded all the stuff from my house I sold out of it. Fired right up and drove it around. It convinced me to keep it. I can’t replace it, and quite honestly don’t even know what I would buy otherwise.
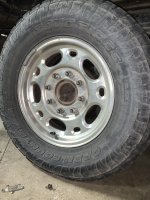
So I pulled the 35s off it and bolted the stocks back on for now. That way I can sell those and start buying parts to fix it up this winter.
So here it is in super hoopdie mode.
So I pulled the 35s off it and bolted the stocks back on for now. That way I can sell those and start buying parts to fix it up this winter.
So here it is in super hoopdie mode.
Attachments
Funny the last post in here was my super hoopdie.
Spent some time with it yesterday. Oil change, checked/ topped off the diffs, fixed an abs wire the stock wheels ate, put my rear bumper and hitch back on, finally put the last hub cap on.
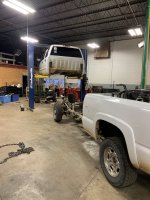
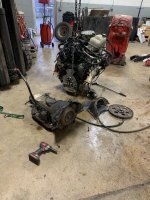
Then pulled some parts off it the donor truck I got to start fixing mine.
6.0 2wd, 100% rust free.. I wanted the cab and 6.0, kept the mint pyos as well.
Spent some time with it yesterday. Oil change, checked/ topped off the diffs, fixed an abs wire the stock wheels ate, put my rear bumper and hitch back on, finally put the last hub cap on.
Then pulled some parts off it the donor truck I got to start fixing mine.
6.0 2wd, 100% rust free.. I wanted the cab and 6.0, kept the mint pyos as well.
Attachments
-
 FFB52F3C-F732-45EB-A191-06FBD48C51E0.jpeg328.2 KB · Views: 23
 -
 C6E17396-92AC-4A86-A64B-DFBFA682B0BB.jpeg289.4 KB · Views: 23
 -
 EB211F81-BD5D-4634-A2AE-CD645FAF2E55.jpeg322.7 KB · Views: 21
 -
 4E0DC97D-30DB-45A9-A22A-97F304587ABC.jpeg323.3 KB · Views: 21
 -
 2B5C2EA7-C810-4C34-9378-3B756D76B6F6.jpeg243 KB · Views: 22
 -
 EFEF0886-3E8F-413C-9578-0FD4B4F0CB9D.jpeg385.7 KB · Views: 23
What are your plans, Corbin? Whats the 6.0 going into?
Ive always wondered this....what do you do about the VIN plate if you swap cabs? I can see that in my future, but I can never get a straight answer on it.
Ive always wondered this....what do you do about the VIN plate if you swap cabs? I can see that in my future, but I can never get a straight answer on it.
I'd imagine you could pop the windshield out of both cabs, drill out the rivets, and swap the VIN plates.
Sent from my FlashScan V2 using Tapatalk
Sent from my FlashScan V2 using Tapatalk
What are your plans, Corbin? Whats the 6.0 going into?
Ive always wondered this....what do you do about the VIN plate if you swap cabs? I can see that in my future, but I can never get a straight answer on it.
Funny I don’t even have anything to put the 6.0 in yet. But the money was right and it’s in the rainy day stash.
As Dave said I’ll just swap vin plates. Although probably not the politically correct way to do it, that’s what I’m going to do.
As for plans I’m just fixing the lbz up a bit. Just a nice old man truck. Nothing crazy. Stock as possible. Keep the lift, put my new wheels on it. Tint the windows.
Finally changed out a powersteering line today on my lmm for the first time in its life. Not to bad considering alot of people have issues with them. The other 2 are bone dry still never been changed once. Also changed out my belt tensioner to a Dayco and the idler pulleys.
What about the fan pulley
What about the fan pulley
Spent most of they day playing with the block... It's amazing how different diamond hones affect the bore finish.
Finally figured the right combo to achieve the desired finish. The difference in bore distortion with out a plate and with it torqued down is also an eye opener. Averaged .001- .0015 and as much as .002 in some places...
Also the final reading you get for the surface finish varies depending on where you take the reading.
Definitely learned alot today.
Last edited: