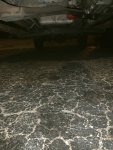
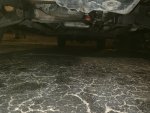
Here’s two pictures of my drivers side mount. From what I can tell, the frame side of things look solid, not damaged or missing any bolts. That doesn’t mean the mount itself is still good though.
Bad trans Mount???
- Thread starter CCLB06
- Start date
You are using an out of date browser. It may not display this or other websites correctly.
You should upgrade or use an alternative browser.
You should upgrade or use an alternative browser.

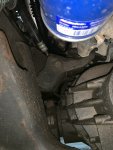
Looks like you have a good power steering/hydro boost leak too.
Looks like you have a good power steering/hydro boost leak too.
The old stuff did leak. It’s now got a PSC gearbox, 2011 hydro boost, new master cylinder. A majority of that wet shit is from when I was bleeding the system, I overfilled the power steering reservoir.
Well I did a thorough check of my engine mounts this weekend, everything looks good. I went as far as putting a jack under the engine to see if it would move at all and there’s absolutely no movement.
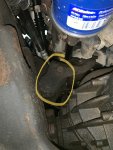
I think my issue here is the bent transmission crossmember. If you look closely at the crossmember it’s bent pretty good on the passenger side, I believe that might be making the trans appear to be leaning on the driver side. I could be wrong but it’s a start and a easier fix.
I think my issue here is the bent transmission crossmember. If you look closely at the crossmember it’s bent pretty good on the passenger side, I believe that might be making the trans appear to be leaning on the driver side. I could be wrong but it’s a start and a easier fix.
a good chunk of wood between a jack and the engine midplate will lift the engine high enough without damaging anything. then its a matter of pulling the inner fender, pulling the steering shaft, intercooler tube and maybe a few other things to get to the mount. Then you have to fight the 3 bolts that hold the mount to the frame adapter. might need heat on them as the red loctite is pretty damn strong on those (speially if you have rust issues) and ive personally broke a few bolts off removing them (in a non rust belt state).
I have broken quite a few loosening by hand (they are TIGHT), but the ones I impacted out never broke. It's either a fluke, or the impact removes them so quickly they don't have a chance to heat up AND expand, whereas loosening them by hand heats them up and gives them time to expand and gall/seize. 3 sets by hand with broken bolts, 4 sets with impact and no broken bolts (New England rust belt and roughly the same ages as the time). Again, could be a fluke, but if not may save people the hassle of dealing with broken bolts (or at least as many) in the future.
I have broken quite a few loosening by hand (they are TIGHT), but the ones I impacted out never broke. It's either a fluke, or the impact removes them so quickly they don't have a chance to heat up AND expand, whereas loosening them by hand heats them up and gives them time to expand and gall/seize. 3 sets by hand with broken bolts, 4 sets with impact and no broken bolts (New England rust belt and roughly the same ages as the time). Again, could be a fluke, but if not may save people the hassle of dealing with broken bolts (or at least as many) in the future.
How in the world did you fit an impact between the frame rail and the engine?
How in the world did you fit an impact between the frame rail and the engine?
Remove the large motor mount through bolts, jack up engine (helps if you loosen trans mount) and shallow impact swivel.
Edit: I use an air ratchet, so not technically an impact gun, but after busting loose 1/8 to 1/4 turn with wrench the air ratchet takes them out.
Last edited:
Remove the large motor mount through bolts, jack up engine (helps if you loosen trans mount) and shallow impact swivel.
Edit: I use an air ratchet, so not technically an impact gun, but after busting loose 1/8 to 1/4 turn with wrench the air ratchet takes them out.
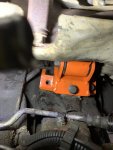
Are you talking about these bolts circled? See my attached picture
Attachments
Are you talking about these bolts circled? See my attached picture
Yes, BUT the engine has to be supported first.
Technically it's not part of the rubber isolated motor mount (but it's what the motor mount bolts to) and DOESN'T have to be unbolted to swap the mount, but it makes things much easier especially getting the mount out (or so I've found) and especially upon install of new mounts and alignment.
And bolt the new mount to the block first, then to the frame (I didn't on the first set and spent way too much time trying to get the bolts started.).
Awesome, thanks a lot for the tips.
No problem. You can try it first without taking out the through bolts (it will save you some time if you don't have to), but if you run into any troubles with mount removal or reinstall alignment, you can definitely take them out. Like I said, not necessary, but it may save you headache depending on your situation.Awesome, thanks a lot for the tips.
No problem. You can try it first without taking out the through bolts (it will save you some time if you don't have to), but if you run into any troubles with mount removal or reinstall alignment, you can definitely take them out. Like I said, not necessary, but it may save you headache depending on your situation.
Alright! I may call a dealership just to see what they would charge. I’ve done so much work to the truck the past few weeks I’m just exhausted between that and working 65+ hrs a week.
I have broken quite a few loosening by hand (they are TIGHT), but the ones I impacted out never broke. It's either a fluke, or the impact removes them so quickly they don't have a chance to heat up AND expand, whereas loosening them by hand heats them up and gives them time to expand and gall/seize. 3 sets by hand with broken bolts, 4 sets with impact and no broken bolts (New England rust belt and roughly the same ages as the time). Again, could be a fluke, but if not may save people the hassle of dealing with broken bolts (or at least as many) in the future.
See I've had the opposite experience here in Northern MI/WI. Impact is a crap shoot, ratchet at least allows me to feel if it's moving nicely and work it with some spray. Typically I'll use heat if they're being a pain in the rear.
Well I did the mounts myself and while it wasn’t to bad of a job, The alignment part was a bitch. I got all the holes to line up perfect on the passenger side mount, however on the driver side mount I could only get 2 out of 3 to line up. I tried everything I could being I was a one man wrecking crew. I gave up and only put 2 bolts in on the driver side.
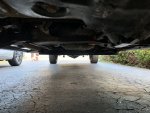
nothing looks bent on the frame Mounts so I’m stumped on why it is so troubling to get aligned. Also my engine and trans still appears to lean towards the driver side. Is this normal?
nothing looks bent on the frame Mounts so I’m stumped on why it is so troubling to get aligned. Also my engine and trans still appears to lean towards the driver side. Is this normal?
Attachments
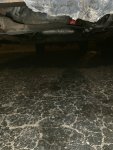
Looks Good to me besides the bent cross piece.
Looks Good to me besides the bent cross piece.
so the trans pan looks level to you? maybe the bent crossmember is creating an optical illusion
Looks level with the ground yes.
New transmission mount & crossmember, new merchant automotive engine mounts. Something still seems off, maybe it’s just me and I’m being OCD but it looks like it’s still leaning.
Are they supposed to lean like this? Some post an underside picture of their truck for me to reference, please!!!
Are they supposed to lean like this? Some post an underside picture of their truck for me to reference, please!!!
Attachments

Well, you havent replaced/repaired the bent sheetmetal brace between the lower control arms under the oil pan. That definitely needs to be done.