LBZ Land Rover Discovery

Bread

New member
Jun 7, 2011
39
0
0
Long story short, I bought an '06 6600 Express van with an LLY in front of a 4L85e for a swap project. It was involved in a front end collision that damaged some of the cast intake parts starting with the EGR and ending with the bridge.

In any case, I've got it torn down to the intake runners and I see a lot of soot caked inside. The EGR made a real mess in there, so before I put the new bridge on and start reassembly I'm wondering if I should pull this apart any further to have that soot cleaned out? Or perhaps I can spray some cleaner through the intake once it's running? I'd hate for any large chunks of crap to break loose and cause a problem.

liftoff.jpg


12-28-12_zpse363f6dc.jpg


Intake_zpsc2e92257.jpg
 

TRUBBS

Member
Jul 6, 2011
461
0
16
id pull the runners off and give them a good cleaning!
also would weld the uppipe shut while you have it apart so that it no longer puts soot to the egr cooler ect, if you are worried about the egr system still being there for visual inspections


if not i would go ahead and delete it while its out and apart
 

blk smoke lb7

<-----Lots of green $
Nov 8, 2010
5,694
0
36
59
belvidere,ill
id pull the runners off and give them a good cleaning!
also would weld the uppipe shut while you have it apart so that it no longer puts soot to the egr cooler ect, if you are worried about the egr system still being there for visual inspections


if not i would go ahead and delete it while its out and apart
X2
 

THEFERMANATOR

LEGALLY INSANE
Feb 16, 2009
3,890
45
48
45
ZEPHYRHILLS, FL
Also keep in mind that it is basically an LBZ with a custom OS in the ECM. The 04.5-05 LLY is a completely different engine for all intentful purposes, so keep that in mind. And depending on what your swapping it into, you may want to consider going back to a truck intake Y bridge instead of the van one that routes up the middle of the engine.
 

Bread

New member
Jun 7, 2011
39
0
0
Bummer, more stuff to take apart! It's much more fun to put stuff together, but that soot really bothers me so I suppose it's best to clean it out. There's all kinds of crap in the way still, sigh.

I already purchased a new van bridge. It's got larger air passages, and the upward facing flange allows me a lot of flexibility in routing the intercooler return tube.

I also already removed the EGR port on the up pipe. This vehicle will be a frankenstein, so I'm really not sure what emissions requirements I'll have but I'm sure the EGR will not be necessary.

1.jpg


3.jpg


9.jpg


The powertrain is going into an expedition vehicle. I have a pair of one ton axles (D60 front, Super 70 van rear end), and HMMWV wheels/tires which will put the rpms right in the sweet spot at 65mph. The focus is reliability and economy, so that's why I chose the van powertrain over the truck. I'm hoping to squeek out 16mpg when it's said and done, but we'll see.

Tires.jpg
 

Bread

New member
Jun 7, 2011
39
0
0
Have you said what you are putting it in or did I miss it?

Missed your question. I was going to put it in my 71 Scout II, but the body is in need of major rust repair and will require a ton more work to modernize the interior enough to make it a comfortable long distance rig:

Scout.jpg


So I picked up a 2003 Land Rover DII with a blown engine. The disco has modern headlights, rust-free body (aluminum panels), and a modern comfortable interior. All the negative points of the rover (basically everything under the hood) will be removed in my swap, so I think it's a great choice:

Rover_zpsd94059fc.jpg


The first obstacle was trying to do a title transfer here in WA on a non running vehicle. It's previous owner lives in a place that did not require emissions. My area requires it. So before I can transfer the title, I need the emissions test done unless I apply for a "certificate of fact" which states it doesn't run. I think that might cause problems for me once I get the diesel in there, so I didn't register it yet. Gotta do more research still and figure this out.
 

Bread

New member
Jun 7, 2011
39
0
0
Small update. I got the intake torn down, cleaned and put back together with new parts. I didn't find any chunks of aluminum inside, so it looks like nothing got sucked in after the crash. Seeing as the speedo is pinned at 70mph, I figured it shut the engine down almost instantly when the airbags blew. I also put a socket on the dampener and rotated the crank through 4 revolutions. Felt pretty good, although there could still be unseen internal damage which is why I was hoping to fire it up before forcing it into the donor vehicle.

I moved onto the wiring and have been beating my head against the wall for months. The under hood fuse block was partially crushed in the accident, so I replaced all the broken relays and fuses. Then I removed all the circuits not required to run the motor. Unfortunately there seems to be an internal short because if I put my 12v lead on the outside terminal, it shorts the entire electrical system to 2.7v. I've disconnected most of the body wiring other than the BCM since I believe it controls the passlock2 and won't start without it. But even with the entire unmodified original wiring harness in place from the steering column to the throttle pedal, I can't get it to even try to click the starter relay on.

A new fuse block looks to be $230 plus the covers from here: http://www.newgmparts.com/parts-cat...6l-v8-diesel/electrical/electrical-components

So I don't know if I should go that route or just start making my own stand alone harness. Any insight?
 

Attachments

  • IMG_6784.jpg
    IMG_6784.jpg
    120.7 KB · Views: 89
  • IMG_6771.jpg
    IMG_6771.jpg
    91 KB · Views: 77

Bread

New member
Jun 7, 2011
39
0
0
I had the wrong fuse diagram (mine is missing and the Haynes Duramax book I have doesn't show it). With the correct diagram in hand I installed the correct relays and fuses, so now the gauges and lift pump power up. After fixing a bad engine block ground (factory, undamaged oddly enough) the starter now engages and cranks it over. I get some sputtering and smoke, but no fire. I had two broken fuel return lines, and I read perhaps wrongly that these are needed in order for it to run. So I replaced all lines using a kit from Sinister Diesel. Still no worky. Ran the codes (16 pop up):

U0101 Lost communication with TCM
P2564 Turbo boost control pos. sensor circuit low
P0540 Intake air heater A circuit (I have it disconnected)
P0405 EGR (I have it disconnected)
P064C ??

Most of these were expected from the missing EGR, Intake heater, etc. But a dozen of them were the U0101 Lost communication with TCM. Even after clearing codes, those dozen pop up instantly when the reader refreshes, so I'm going to poke through the wiring again tomorrow. There must be some damage to the harness, or my TCM is fried.

And although the Haynes book isn't the greatest, it did reveal that despite my 8th VIN digit being a 2, which means LLY. This engine is actually an LBZ identified by the fuel rails, and lack of an FICM.
 
Last edited:

Bread

New member
Jun 7, 2011
39
0
0
There was a pushed out pin on the TCM connector. Finally I can pull it off the van frame and work on stuffing it in the Rover. Will be nice to have the extra room in my backyard :)

<embed width="600" height="361" type="application/x-shockwave-flash" allowFullscreen="true" allowNetworking="all" wmode="transparent" src="http://static.photobucket.com/player.swf" flashvars="file=http%3A%2F%2Fvid247.photobucket.com%2Falbums%2Fgg149%2FBread996%2FDura%2520Rover%2520Build%2FDuramaxfirststart_zpsae4763ab.mp4">

http://s247.photobucket.com/user/Br... Build/Duramaxfirststart_zpsae4763ab.mp4.html
 

Bread

New member
Jun 7, 2011
39
0
0
Some good progress. I hope these links work. I'm not able to edit my previous posts due to being an FNG, so sorry about that.

This weekend was my attempt at the physical portion of the swap. Before doing so I wanted to do some maintenance while the motor is easy to work on. I purchased a new set of Delco/Beru glow plugs. As others have experienced, the top threads were so rusty that I broke two off in the drivers side head despite my efforts with a torch, and weeks of soaking with penetrating fluid before and during wrenching:


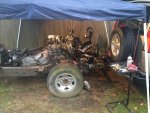
Still need to drill those out, but we went ahead as planned. Here's the Duramax finally leaving the van frame. That's my Dad who offered to come down and help, but he seems to have had quite enough of this type of fun after spending the weekend at the shop with me! 1345 lbs. total. (Got a new crane scale and finally had a chance to try it out). That's with all motor accessories, but some oil leaked out of the trans and there is no oil in the transfer case:


Here's the crazy lifting fixture I made to pull the LR body off. I was going to just buy a two post lift for this project, but I'd have to bolt/unbolt it from the concrete every weekend as this is a working machine shop during the week. I opted to try this backyard engineering feat first. Steel I-beam up top, 2x8's below glued and screwed. Got scared at the last minute and added some joist hangers to the boards that capture the sills. So it wasn't entirely made out of wood :) The body weighs about 2800 lbs. fully dressed with interior and glass as shown. I didn't strip anything out of it:


Rover engine (Buick block actually) next to the monster Duramax. Granted the LR block is stripped down, but still. Getting nervous about my 'plan' at this point:


Here's the LBZ wedged between the frame rails. Had to remove the LR steering box (inside the frame design), so I'll have to go with a Ford or Scout outside mount Saginaw box. Also had to remove the oil filter/cooler assembly. Looking at options to remote mount such as the PPE cooler delete kit with the Amsoil bypass filter mount. But, this allows enough passenger side offset to run the drivers side exhaust and sit the engine much lower in the frame where it needs to be to fit under the hood:


1.75" passenger side offset. The motor is 6" further forward than the LR block, but there's just enough room to fit the belt:


This is why the engine has to be so far forward (and it gave me better rear driveline angle to boot):


Even with this arrangement I need to hammer back the firewall to clear the exhaust flange, and possibly install a 1" body lift. The way it sits now the A/C condenser lines are touching the downpipe, and the hood is touching the water hose casting on top of the motor. I have to look at swapping in some truck parts to try and get more clearance.
 

Bread

New member
Jun 7, 2011
39
0
0
I forgot to show the process of fitting the transfer case to the 4L85e. The RH drop NP241c was only used for a couple years, fitted behind the 700r (27 spline input) and the TH400 (32 spline input) trans. I was only able to find a 27 spline and needed to change it out. I had scrounged around for quite a while on CL and eBay before finally breaking down and heading up to pick and pull to get it myself. I could get a new one for $150, but I'm trying to keep with my CL/junkyard build theme. So after 3 hours under a IFS suburban with only hand tools I finally got the stupid case out and disassembled:


So $20 for the part, and 3 hours of my labor. Meh, it is what it is. And, here they are side by side:


So I installed the output, cleaned and resealed the case before realizing that I forgot to modify the output shaft for a SYE (slip yoke eliminator). A SYE kit is available for this case at around $400 before tax and shipping, but again this is a junkyard build and I enjoy making things myself. The SYE is necessary on my short wheelbase vehicle to gain as much driveline length, and therefore better angle as possible. So I just rigged the entire case in the lathe:


The HSS parting tool didn't do much more than make a dent on the hardened teeth so I actually cut the shaft off with a cut-off blade (after protecting the lathe with blankets), then easily faced it off with carbide tooling. I left 2" of splines, just like the front output. Anything shorter and you're going to have problems. Drill, tap for a grade 8 bolt. Finally getting to try out my new tap handle was actually the most fun part:


Done:


Shortened the slip yoke. I switched to my home brew carbide parting tool and it cut easily:


Then I started on the new seal ring to work with the short yoke. I roughly hacked out a circle from a piece of scrap aluminum laying in the shop. Chucked it up, turned and faced one side:


Turned it around, bored thru to the seal diameter and counter bored to center and retain the output shaft bearing just as the original tail shaft cone did:


Put it in the Bridgeport to dril the mounting hole pattern. One of the holes is a degree out of timing from the others, so it only fits one way:


Installed:


Oh, and I had to chop 3" off the 2wd output shaft of the trans and a little bit off the new TC input shaft as there are like three different lengths and I picked up the long one:


Bread

New member
Jun 7, 2011
39
0
0
On to the oil filter housing clearance issue. I emailed PPE about their kit as I had a few questions about the water connections. They still haven't replied, so I took a closer look at the factory oil cooler/filter assembly and decided I could make it work. First I chopped the oil ports off with a band saw, and put it in the mill:


Here's a shot after a few passes with a face mill. Kinda neat:


After facing, the hole size was nearly perfect for a 1/2" NPT tap. Checking with a depth gage here:


Deburred and polished up it looks just like the PPE unit, and $270 cheaper to boot!


Pay no attention to my cardboard oil pan. I'll get to that soon.
 

Bread

New member
Jun 7, 2011
39
0
0
Now to restore the coolant connections. I'll spare you the machining shots as I'm getting tired anyways. I made this cover plate out of 1/4" aluminum:


The hole in the middle is the result of it being another repurposed piece of scrap found in the shop, but I figured I'd just drill it larger and tap it for some future use. Plugged it for now:


Cleaned up the gasket faces, polished the bores etc and reinstalled everything:


I should still have the clearance I need, so now I just need to decide on a remote oil filter head, possibly a cooler and run the lines. For now, everything is plugged while I move onto other projects:


Bread

New member
Jun 7, 2011
39
0
0
Last update for tonight. I have an interference issue with the oil pan and the front diff/driveline. The rover trans tunnel is offset to the drivers side to accommodate the ps drive differential. Unfortunately the Duramax is designed for a drivers side differential, and has offset the oil pan to accommodate this design. Here's a shot of the issue:


After some careful measurement's I did some minor trimming to the oil pan to take care of the problem:


Ok maybe a lot of trimming, but now there's a straight shot to the driveline. I would prefer to cut the entire flange off the aluminum upper pan, but that would require taking it out and welding in a new flange, machining new bolt holes, etc. And I wouldn't gain much because the starter is a inch above it, so for now I'm going to try this approach:


Another neat cutaway view:


If I still have clearance issues I'm going to have to shorten the pickup tube but I think I'm ok. I can't move the motor any further to the drivers side or I won't have room for a steering shaft. So at the next engine test fit if it looks good I'll roll a piece of steel in my slip rolls to cover the hole I made and add a bump out on the drivers side to restore the oil capacity I took away.
 

RENODMAX

Dead Wrong
Mar 4, 2008
3,602
0
0
Very cool stuff. I like seeing different builds. Making the rover electronics play with the Duramax stuff doesn't seem like a terribly good time.
 

Bread

New member
Jun 7, 2011
39
0
0
Very cool stuff. I like seeing different builds. Making the rover electronics play with the Duramax stuff doesn't seem like a terribly good time.

Yes and No. LR was owned by BMW during these years, using their Bosch Motronic electronics which is good. I don't see a whole lot of crap Lucas stuff which is promising :) LR has a bank of computers under the dash, just like GM. After stripping out the ECM, all the body controls tested fine. So it appears not many things in the ECM are tied to the BCM with Land Rover. Everything from the radio to the headlights works independently. So that's promising. The only failure I had was that the dash lights don't illuminate when switching on the headlights, so I'll have to track the cause of that down in the LR service manual I bought.

I haven't dug into the airbag electronics yet. I'm not sure if the systems are tied into the ECM or whatever so I may end up just unplugging them for safety. ABS will be disabled as well. It won't work with the new axles anyways.

I stripped out the LR instrument cluster and will have to cut down the van cluster to fit in its place. I'll have to fabricate a new dash shroud. Then it's just a matter of tracing wires to connect LR body wires to the cluster such as the turn signal indicators, high beams, etc.

The speed sensor will be adapted to the transfer case output. The NP241 I chose has a standard reluctor ring arrangement to measure vehicle speed. I also have to wire in the 4wd indicator switch to the ECM, which the van's never had.

Really the biggest problem I'm having is with the Dmax van ECM seeing as it's so different than the truck ECM's. I was going to swap a truck cluster in so I have a tach, but the van communicates to the gauges differently than the truck. There's tons of other differences from TCM programming, factory lift pump, to the Espar diesel heater I have. But I can't fit a 4wd Allison in this little vehicle, so I had no choice as far as the physical components go. In any case, I've got help with the wiring to make the engine run stand alone.

This isn't entirely new territory as I converted the Scout pictured above to EFI entirely from junkyard parts. Made my own electronic distributer, and wired every pin myself to custom fit the harness to the vehicle. Although those early GM EFI systems were designed to run as stand alone systems already so it's not a fair comparison :)
 

THEFERMANATOR

LEGALLY INSANE
Feb 16, 2009
3,890
45
48
45
ZEPHYRHILLS, FL
A couple of things. Are you going to use the 2 speed sensors in the trans to the TCM? It looks like you have a 2 wheel drive 4L85E which has the 2nd reluctor ring in it to feed a speed signal to the TCM for shifting. I don't think there is any operating system for a DURAMAX T42 TCM that would shift correctly in 4 low if you used the speed sensor in the transfer case like GM does for 4X4's. If you go with the 2 speed sensors in the trans, then there is no reason to hook up the 4X4 signal wire to the ECM. Chances are teh ECM won't recognize it, and if it does all you will do is get a P0500 code in 4 low(I get this one in my swap since it has no ABS speed sensor feed to the ECM). I would hook the engine and trans up so it has no idea it is a 4X4. The speedo will be incorrect in 4 low, but it is a small price to pay to have the engine and trans play nicely with a 4X4 since there is no operating systems for either the van ECM or DURAMAX T42 TCM to work with 4X4.

And for your oil pan, I owuld go ahead and pull the upper pan and cut the kick out out of it. If you ever need to change the starter out, it will make things ALOT easier to do so without that kick out there.
 

Bread

New member
Jun 7, 2011
39
0
0
A couple of things. Are you going to use the 2 speed sensors in the trans to the TCM? It looks like you have a 2 wheel drive 4L85E which has the 2nd reluctor ring in it to feed a speed signal to the TCM for shifting. I don't think there is any operating system for a DURAMAX T42 TCM that would shift correctly in 4 low if you used the speed sensor in the transfer case like GM does for 4X4's. If you go with the 2 speed sensors in the trans, then there is no reason to hook up the 4X4 signal wire to the ECM. Chances are teh ECM won't recognize it, and if it does all you will do is get a P0500 code in 4 low(I get this one in my swap since it has no ABS speed sensor feed to the ECM). I would hook the engine and trans up so it has no idea it is a 4X4. The speedo will be incorrect in 4 low, but it is a small price to pay to have the engine and trans play nicely with a 4X4 since there is no operating systems for either the van ECM or DURAMAX T42 TCM to work with 4X4.

I don't know what I'm doing actually :) I just made sure the transfer case had the electronic tail housing vs the mechanical with the hopes I could get it figured out. Good to know it wont. I don't even know what changes the truck ECM/TCM makes when shifted to 4low other than changing the speedo reading on the instrument cluster. If that's the only thing that's off then I don't mind at all. Most places I plan to go will be 4hi territory. The few miles I put in 4low will be 2.72x more than normal, but that's not a big deal as you said. I just want to make sure it shifts properly.

And for your oil pan, I owuld go ahead and pull the upper pan and cut the kick out out of it. If you ever need to change the starter out, it will make things ALOT easier to do so without that kick out there.

Yea, I really hate that kick out. I've got a nice Miller TIG machine with aluminum rod at my disposal, but I'm not very good at it. But you're right, I didn't notice until you pointed it out that there's actually no way to remove the starter once it's wedged between the LR frame rails. I'm going to start looking at doing it. Looks like I have to separate the trans from the engine to access the two bolts at the back.

I thought about a Kodiak pan too for a while. The pictures I have show the upper pan to be a simple rectangle. Then I'd just need to modify the pickup tube and cut the hump off the steel lower pan so it clears the steering. But it's an expensive assembly, and if I'm chopping stuff up anyways I might as well chop up what I have.

My focus today is to drill out those two busted glow plugs while I still have the engine on the bench. Gotta grind some special pilot drills.
 

THEFERMANATOR

LEGALLY INSANE
Feb 16, 2009
3,890
45
48
45
ZEPHYRHILLS, FL
I learned the hard way about the starter. In my swap I can't get it out, so I have to lay it over to the side to get access to the torque converter bolts.

In a truck the TCM and ECM both use the speed sensor in the rear of the transfer case for the speed signal. When you put it in 4 low the TCM multiplies the signal by 2.72:1 to get the speed of the trans output shaft. Also it uses the 4 low signal to figure torque specs and max torque figures that are set in the ECM. And when the ECM senses 4 low, it will compare the sensor reading against the ABS speed sensor readings. in a swap it doesn't receive those and it will give you a P0500 code(mine does this, so I had to shut the code off). By staying with the output speed sensor in the trans, the only adverse side effect will be your speedo will be off 2.72:1 in 4 low. But all of your shifts will be on, and it won't give you other issues with the van operating systems in the controllers.